> ## Documentation Index
> Fetch the complete documentation index at: https://statsig-4b2ff144-kill-dead-node-pages.mintlify.site/llms.txt
> Use this file to discover all available pages before exploring further.
# Running a Warehouse Native POC
> How to plan a proof of concept with Statsig Warehouse Native (WHN), including the components of our solution, steps required to successfully lead a proof of concept & validation/next steps to productionize
## Introduction
**Statsig Warehouse Native** enables customers with existing metric logs to quickly run analysis on their existing metric data, and optionally bring previous assignment data/offline experiments into the platform quickly. Statsig WHN has has two types of experiments:
- **Assign and Analyze**: You can run an experiment on **web/mobile/app** and use Statsig’s SDKs to assign (bucket or randomize) users, and then analyze results.
- **Analyze**: You can run an experiment elsewhere (***your own SDK, email, direct mail, sms, ivr, etc.***) and use Statsig to analyze that data and calculate experiment results. This assignment data can be read from your warehouse in [this format](/statsig-warehouse-native/configuration/assignment-sources#example-data) - we call these [Assignment Sources](/statsig-warehouse-native/configuration/assignment-sources).
If you have a pre-existing experiment in your warehouse, we recommend getting started first with an **Analyze** experiment. This is an effective and quick way (less than 1 day) to get comfortable with establishing a connection between Statsig and your warehouse, and the experience of consuming [experiment results](/pulse/read-pulse) in the Statsig console. Then, we recommend running a **Assign and Analyze** experiment using Statsig's SDKs; typically an A/A test. With the A/A **Assign and Analyze** experiment, you can test Statsig's SDKs and implementation process with your engineering and product team.
# Steps to running an effective Proof of Concept with Warehouse Native
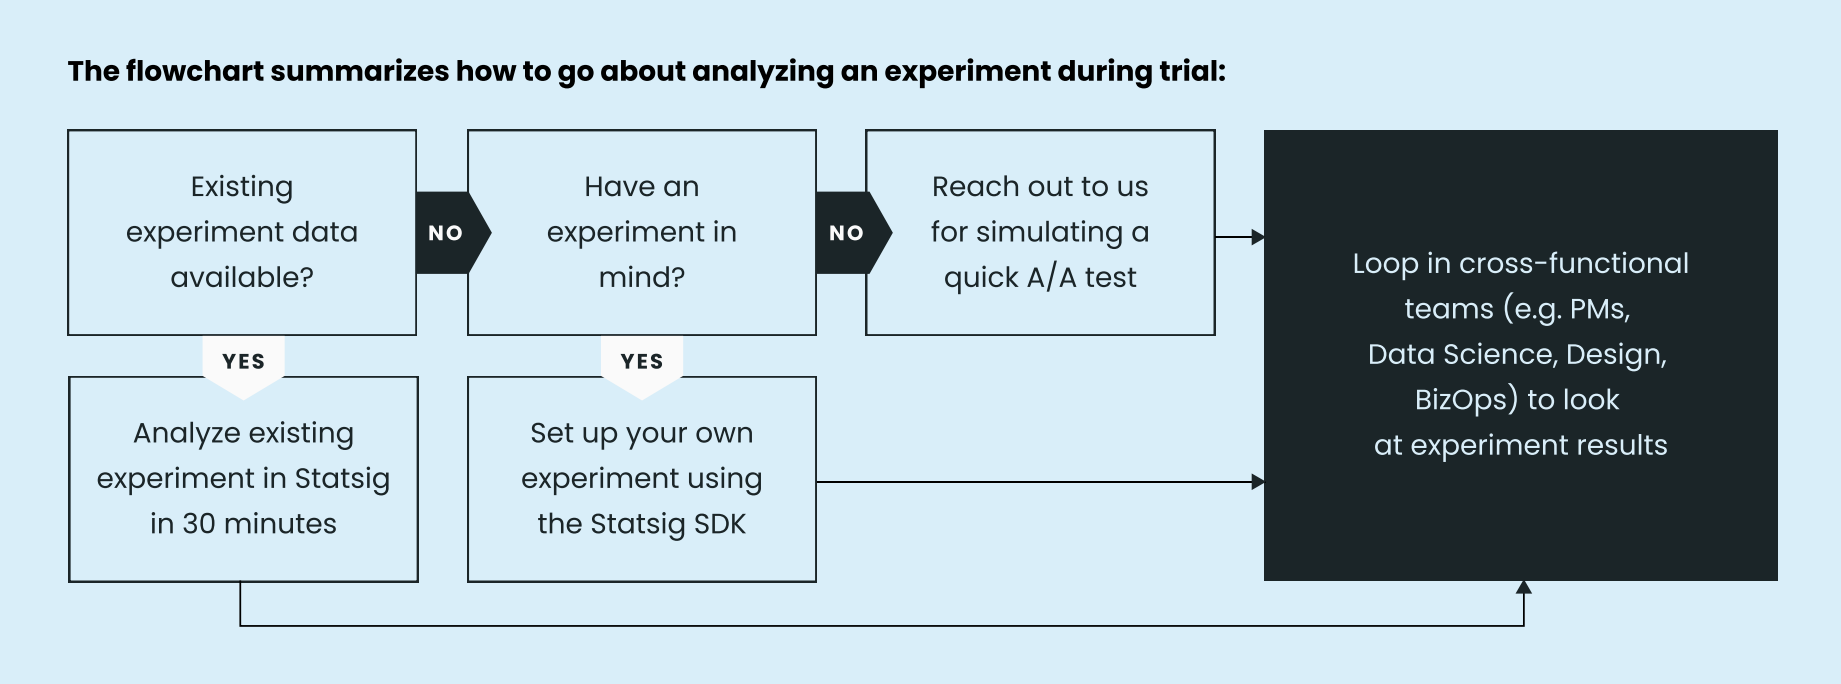 Keep these high level steps in mind as you begin your planning your Warehouse Native implementation:
1. **Define your experiment(s) and metrics for validation** - Ultimately a proof of concept will determine if Statsig fits your experimentation needs thus running an experiment with Statsig is the quickest path for evaluation. — **Responsible Party**: Typically a product or engineering lead
* Plan to run 1-2 production level experiments to validate. Past experiments, A/A tests or upcoming projects or product changes are great opportunities to implement a Statsig experiment!
* Identify your hypothesis and [metrics](/statsig-warehouse-native/configuration/metrics) which will validate this hypothesis. These metrics will be joined with unit assignment/exposure data and run through the stats engine.
* If your team plans on running **analysis only**, identify the user **assignment** data which will be joined with the metric data.
* This approach can yield results for analysis in as little as **30 minutes,** assuming data is readily available for ingestion
* If your team plans on utilizing the **Assign and Analyze** experimentation option, you’ll want to identify **where** the experiment will run. Typically **web based** experiments are easier to evaluate, however Statsig has SDK support for server and mobile SDKs as well.
* **Note**: It’s important the implementing team understands how the SDKs operate prior to executing a proof of concept. Our [client](/client/introduction) and [server](/server/introduction) docs can help orient your team!
* A typical evaluation takes **2-4 weeks** to account for experiment design, implementation, time to bake, and analysis. To ensure a successful POC, [have a well scoped plan](/guides/running-a-poc#2-phase-0-scope--prepare-your-poc) and ensure the right teams are included to assist along the way.
* Read [experimentation best practices](https://statsig.com/blog/product-experimentation-best-practices) to get an idea of how to best succeed.
2. **Connect the Warehouse** - In order to query data and operate within your warehouse, you’ll need to allocate resources and connect to Statsig. You may choose to utilize an existing prod database or create a separate cluster specifically for experimentation (if you don’t already have one).
* Statsig requires a role and the following access:
* Read access to metric and exposure data
* Write access so results and exposures can be written back to the warehouse
* Access to run jobs and query data
* Find more guidance on [connecting with your specific warehouse vendor here](/statsig-warehouse-native/guides/connect).
* Review the [data pipeline overview here](/statsig-warehouse-native/pipeline-overview) to see how data flows for warehouse native jobs.
3. **Connect Metric Sources & Define Metrics** - Once the data warehouse has been connected, you can begin defining metric and assignment sources (if applicable) to Statsig. Our systems expect specific schemas in order to correctly map the data to our pipelines:
Keep these high level steps in mind as you begin your planning your Warehouse Native implementation:
1. **Define your experiment(s) and metrics for validation** - Ultimately a proof of concept will determine if Statsig fits your experimentation needs thus running an experiment with Statsig is the quickest path for evaluation. — **Responsible Party**: Typically a product or engineering lead
* Plan to run 1-2 production level experiments to validate. Past experiments, A/A tests or upcoming projects or product changes are great opportunities to implement a Statsig experiment!
* Identify your hypothesis and [metrics](/statsig-warehouse-native/configuration/metrics) which will validate this hypothesis. These metrics will be joined with unit assignment/exposure data and run through the stats engine.
* If your team plans on running **analysis only**, identify the user **assignment** data which will be joined with the metric data.
* This approach can yield results for analysis in as little as **30 minutes,** assuming data is readily available for ingestion
* If your team plans on utilizing the **Assign and Analyze** experimentation option, you’ll want to identify **where** the experiment will run. Typically **web based** experiments are easier to evaluate, however Statsig has SDK support for server and mobile SDKs as well.
* **Note**: It’s important the implementing team understands how the SDKs operate prior to executing a proof of concept. Our [client](/client/introduction) and [server](/server/introduction) docs can help orient your team!
* A typical evaluation takes **2-4 weeks** to account for experiment design, implementation, time to bake, and analysis. To ensure a successful POC, [have a well scoped plan](/guides/running-a-poc#2-phase-0-scope--prepare-your-poc) and ensure the right teams are included to assist along the way.
* Read [experimentation best practices](https://statsig.com/blog/product-experimentation-best-practices) to get an idea of how to best succeed.
2. **Connect the Warehouse** - In order to query data and operate within your warehouse, you’ll need to allocate resources and connect to Statsig. You may choose to utilize an existing prod database or create a separate cluster specifically for experimentation (if you don’t already have one).
* Statsig requires a role and the following access:
* Read access to metric and exposure data
* Write access so results and exposures can be written back to the warehouse
* Access to run jobs and query data
* Find more guidance on [connecting with your specific warehouse vendor here](/statsig-warehouse-native/guides/connect).
* Review the [data pipeline overview here](/statsig-warehouse-native/pipeline-overview) to see how data flows for warehouse native jobs.
3. **Connect Metric Sources & Define Metrics** - Once the data warehouse has been connected, you can begin defining metric and assignment sources (if applicable) to Statsig. Our systems expect specific schemas in order to correctly map the data to our pipelines:
 Beyond these columns, the schema is flexible and can accept additional columns. **Metadata** can be used to filter metrics and also be utilized for more granular analysis.
* Review guides for creating a [metric](/statsig-warehouse-native/configuration/metric-sources) and [assignment](/statsig-warehouse-native/configuration/assignment-sources) source
* Follow our [data best practices](/statsig-warehouse-native/guides/best-practices) to ensure your queries are running efficiently.
* NOTE: This section is important to review and can prevent unnecessary infrastructure costs!
After metric sources have been connected, [metrics](/statsig-warehouse-native/configuration/metrics) are configured to perform various aggregations (E.g. Sum, Mean, Count, Unique Users) that represent what you’re trying to measure in your experiments.
* [Supported metric types](/statsig-warehouse-native/configuration/metrics#metric-types) and ways to [configure them](/statsig-warehouse-native/configuration/metrics)
* [Cohort metrics](/statsig-warehouse-native/features/cohort-metrics) can be used to measure impact during a certain time frame per user
4. **Create and Rollout an Experiment** - In step 1, you defined the planned experiment(s) and the metrics used to validate them. With metrics and assignment sources configured, the experiment(s) can now be created. A more detailed guide for experiment setup can be found [here](/statsig-warehouse-native/guides/experiments) but consider these things as you complete this step:
* Create your hypothesis and select the **experiment (assignment) source**
* If using the SDK for assignment, the SDK itself will be the assignment source
* [Custom IDs](/guides/experiment-on-custom-id-types) can be used but they must first be configured - ex: device\_id, vehicleId, etc
* Check out [advanced settings](/statsig-warehouse-native/features/configure-an-experiment#advanced-settings) to see the many ways you can configure your experiment
* As you rollout your experiment, you can [monitor the status with health checks](/statsig-warehouse-native/features/monitor-an-experiment) and get a readout of live exposures as they come through the SDK.
* If you’re hoping to quickly validate the platform, you can create and run a [quick A/A test](statsig-warehouse-native/guides/aatest.mdx).
Need assistance? We’re here to help! Statsig support is available via our [community slack channel](https://statsig.com/slack).
5. **Read Results** - Once the experiment has been successfully run, it’s important to read the results and ensure everything looks reasonable. Was your hypothesis validated or are the results surprising? Are the results easy to interpret and navigate for the teams involved? Check out our [section on pulse](/statsig-warehouse-native/guides/pulse) to get an idea of the high level analytics capabilities. A few things to note here:
* Results can be sliced further via the [explore tab](/statsig-warehouse-native/guides/pulse#explore) and enables you to break down results by specific user and event properties
* Exposure and metric data can be configured to be forwarded to your warehouse
* The [Health Checks (diagnostics) tab](/statsig-warehouse-native/guides/pulse#health-checks) surfaces the SQL used to generate results so you can validate any analysis performed on your systems.
6. **Finalize Evaluation and Next Steps -** Ultimately a POC is meant to validate a set of evaluation criteria that will determine whether or not Statsig is a good fit for your team’s workflows. The following graphic provides high-level guidance on what to look for during your evaluation phase.
Beyond these columns, the schema is flexible and can accept additional columns. **Metadata** can be used to filter metrics and also be utilized for more granular analysis.
* Review guides for creating a [metric](/statsig-warehouse-native/configuration/metric-sources) and [assignment](/statsig-warehouse-native/configuration/assignment-sources) source
* Follow our [data best practices](/statsig-warehouse-native/guides/best-practices) to ensure your queries are running efficiently.
* NOTE: This section is important to review and can prevent unnecessary infrastructure costs!
After metric sources have been connected, [metrics](/statsig-warehouse-native/configuration/metrics) are configured to perform various aggregations (E.g. Sum, Mean, Count, Unique Users) that represent what you’re trying to measure in your experiments.
* [Supported metric types](/statsig-warehouse-native/configuration/metrics#metric-types) and ways to [configure them](/statsig-warehouse-native/configuration/metrics)
* [Cohort metrics](/statsig-warehouse-native/features/cohort-metrics) can be used to measure impact during a certain time frame per user
4. **Create and Rollout an Experiment** - In step 1, you defined the planned experiment(s) and the metrics used to validate them. With metrics and assignment sources configured, the experiment(s) can now be created. A more detailed guide for experiment setup can be found [here](/statsig-warehouse-native/guides/experiments) but consider these things as you complete this step:
* Create your hypothesis and select the **experiment (assignment) source**
* If using the SDK for assignment, the SDK itself will be the assignment source
* [Custom IDs](/guides/experiment-on-custom-id-types) can be used but they must first be configured - ex: device\_id, vehicleId, etc
* Check out [advanced settings](/statsig-warehouse-native/features/configure-an-experiment#advanced-settings) to see the many ways you can configure your experiment
* As you rollout your experiment, you can [monitor the status with health checks](/statsig-warehouse-native/features/monitor-an-experiment) and get a readout of live exposures as they come through the SDK.
* If you’re hoping to quickly validate the platform, you can create and run a [quick A/A test](statsig-warehouse-native/guides/aatest.mdx).
Need assistance? We’re here to help! Statsig support is available via our [community slack channel](https://statsig.com/slack).
5. **Read Results** - Once the experiment has been successfully run, it’s important to read the results and ensure everything looks reasonable. Was your hypothesis validated or are the results surprising? Are the results easy to interpret and navigate for the teams involved? Check out our [section on pulse](/statsig-warehouse-native/guides/pulse) to get an idea of the high level analytics capabilities. A few things to note here:
* Results can be sliced further via the [explore tab](/statsig-warehouse-native/guides/pulse#explore) and enables you to break down results by specific user and event properties
* Exposure and metric data can be configured to be forwarded to your warehouse
* The [Health Checks (diagnostics) tab](/statsig-warehouse-native/guides/pulse#health-checks) surfaces the SQL used to generate results so you can validate any analysis performed on your systems.
6. **Finalize Evaluation and Next Steps -** Ultimately a POC is meant to validate a set of evaluation criteria that will determine whether or not Statsig is a good fit for your team’s workflows. The following graphic provides high-level guidance on what to look for during your evaluation phase.
 Should you decide to move forward, the next step becomes converting your POC environment to a production-level implementation. We have created [this guide](/guides/production) to give you a general sense of what that entails.